Author: Rahul Goel (NetID: rg764)
I. Objective
The primary objective of this lab is to combine Lab 6 (Closed Loop PID) and Lab 7 (Kalman Filter) to produce a fast stunt on the robot.
II. Materials/Software
- 1x Fully assembled robot with Artemis, ToF sensors, IMU sensor, and motor drivers
- 1x USB A to C Cable
- 2x Li-ion 3.7V 650mAh (or more) Battery
Stunt
The goal for controlled stunts (Task A) in this lab are the following:
- Start from < 4m from the wall
- Drive Fast Forward
- Upon reaching the sticky mat, do a flip
- Drive back in the same direction
First, open loop control was tried to perform the stunt. This was done to ensure that the car can actually perform a flop before implementing closed loop control. As seen in the code snippet below, this involved running the forward for 3 seconds, abruptly stopping at the motors (analog output = 255 for all pins) and going backward for 3 seconds.
void forward(){
  analogWrite(left1, 205);
  analogWrite(left2, 0);
  analogWrite(right1, 200);
  analogWrite(right2, 0);
}
void backward(){
  analogWrite(left1, 0);
  analogWrite(left2, 255);
  analogWrite(right1, 0);
  analogWrite(right2, 250);
}
void stop(){
  analogWrite(left1, 255);
  analogWrite(left2, 255);
  analogWrite(right1, 255);
  analogWrite(right2, 255);
}

void loop() {
  delay(5000);
  forward();
  delay(3000)
  stop();
  backward();
  delay(3000)
  stop();
}
The previous attempt at executing the stunt didn’t go as planned, despite following the correct sequence of events and providing maximum possible duty cycle. Now, I’m exploring the possibility of implementing a closed-loop system for the same stunt, taking into account the potential assistance provided by the mat in improving friction and achieving the flip successfully.
void stunt_func(){
  distanceSensor2.startRanging();
  distance = distanceSensor2.getDistance();
  distanceSensor2.clearInterrupt();
  distanceSensor2.stopRanging();
  if (distance > 925) {
    forward();
  }
  else {
    counter++;
    if (counter==1){
    stop();
    backward();
  }
    else{
      backward();
   }
  }
 }
This also didn’t work. The videoes for this attempts are below.
As the first stunt didn’t work I tried the second one and it worked perfectly fine.
I integrated the PID code developed using Time-of-Flight (ToF) and Linear Interpolation from Lab 5 with the orientation control from Lab 6. The system now monitors the distance, and when it drops below 3 meters, it triggers the orientation control to adjust to a desired angle of 180 degrees. Once the orientation is close to 180 degrees, it reverts back to the forward drive control from Lab 5.
Kalman Filter Implementation on the Robot - extra bonus point from last lab
The same P,D, and setpoint values from Lab 5 are used for this implementation. Below is the code snippet of the implementation in Arduino.
Matrix<1,2> C_mat = { -1, 0 };

Matrix<2,2> sig_u = { 15^2, 0,
                      0, 15^2 };
Matrix<1,1> sig_z = { 5^2 };

// Discretize A & B
float delta_t = 0.130;
Matrix<2,2> I_mat = { 1, 0,
                      0, 1};
Matrix<2,2> A_d   = { 1, 0.0127,
                      0, 0.985 };
Matrix<2,1> B_d   = { 0,
                      7.47};

Matrix<2,2> sig   = { 10^2, 0,
                      0, 10^2 };
Matrix<2,1> x_val = {-2000,
0	};
void kf_func(float sensor_reading, float pwm_val){
  Matrix<2,1> x_p = A_d*x_val + B_d*pwm_val;
  Matrix<2,2> sig_p = A_d*sig*(~A_d) + sig_u;

  Matrix<1,1> y_curr = { sensor_reading };
  Matrix<1,1> y_m = y_curr - C_mat*x_p;
  Matrix<1,1> sig_m = C_mat*sig_p*(~C_mat) + sig_z;

  Matrix<1,1> sig_m_inv = sig_m;
  Invert(sig_m_inv);

  Matrix<2,1> kf_gain = sig_p*(~C_mat)*(sig_m_inv);

  // Update
  x_val = x_p + kf_gain*y_m;
  sig = (I_mat - kf_gain*C_mat)*sig_p;
}
void kf_pid(){
    distanceSensor.startRanging();
    float distance = distanceSensor.getDistance();
    distanceSensor.clearInterrupt();
    distanceSensor.stopRanging();
    currentMillis = millis();
    timerCountCurrent = millis();
    kf_func(distance, pwm_val);
    setSpeed_val(PID_pass(currentMillis, previousMillis, error_previous, ((x_val(0,0)*-1) - setPoint)));
    error_previous = (x_val(0,0)*-1) - setPoint;
    if (timerCountCurrent - timerCountPrevious > interval){
      if (counter_h < 1000 ){
        tof_values[counter_h] = distance; //Get the result of the measurement from the sensor

        timeValues[counter_h] = currentMillis;
        pid_out[counter_h] = setSpeed_val(PID_pass(currentMillis, previousMillis, error_previous, ((x_val(0,0)*-1) - setPoint)));;//speed_val;
      }else if (counter_h == 1000){
         Serial.println("400 reached");
      }
      counter_h += 1;
      timerCountPrevious = timerCountCurrent;
    }
    previousMillis = currentMillis;
}
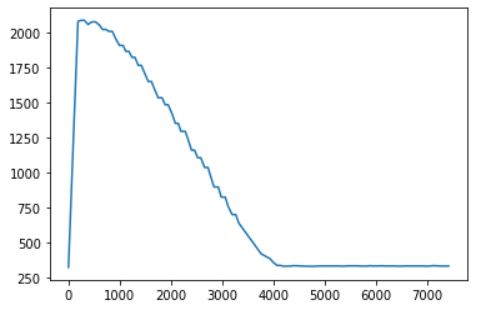
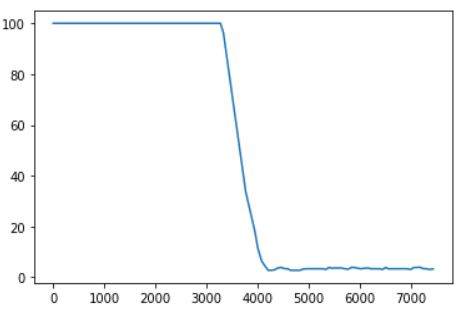
Below are the distance vs time and PWM vs time graphs as well as the video of the Kalman Filter implemented PID control. The motion is a lot smoother and faster due to the Kalman Filter and the robot is extremely close to the setpoint of 300 mm.

IV. Conclusion
The objective of this lab, to perform one of the given two stunt, is successfully satisfied. There were minor issues faced during the lab. While doing the close loop stunt, it was noticed that the distance sensor readings could not keep up with the maximum car speed as the car would not be able to slow down quick enough and perform the flip, but at the end the other stunt worked out for me.
